Craving a restaurant-quality steak but don't have a grill, or perhaps the weather just isn't cooperating? Look no further than the oven-roasted tri-tip! This incredible cut of beef is not only flavorful and tender but also surprisingly simple to prepare right in your kitchen. Forget fancy techniques or expensive equipment; with a few basic ingredients and a reliable oven, you can achieve a perfectly cooked, juicy steak that will impress even the most discerning palates. Say goodbye to grilling woes and hello to your new go-to method for a memorable meal any time of year.
What is Tri-Tip and Why It's Perfect for Oven Roasting?
Tri-tip is a distinctive cut of beef that hails from the bottom sirloin subprimal. Recognizable by its unique triangular shape, it's often referred to as a "triangle roast" or "California cut." While it gained initial popularity in California as an affordable, flavorful grilling steak, its reputation for versatility and deliciousness has spread nationwide.
One of the greatest advantages of tri-tip is its fantastic beefy flavor and wonderfully tender texture when cooked correctly. Unlike some other cuts that demand very specific handling, tri-tip strikes a beautiful balance, offering a rich taste without being overly fatty. Crucially, it tends to be more budget-friendly than premium steaks like ribeye or filet mignon, making it an excellent choice for a family dinner or entertaining guests without breaking the bank. Many savvy shoppers find great deals on tri-tip at warehouse clubs like Costco, often buying a two-pack and freezing one for later use (for best quality, use within three months).
So, why is it so good for oven roasting? The beauty of the oven for cooking tri-tip lies in its ability to provide consistent, even heat. This method, especially when paired with a Reverse Sear Tri-Tip: Oven Roasting for Tender, Juicy Results technique, allows the meat to cook gently to your desired doneness, ensuring maximum tenderness. The reverse sear, where the meat is roasted slowly and then finished with a quick, high-heat sear, creates that coveted crispy crust while keeping the interior perfectly moist and medium-rare. This year-round method means you don't have to wait for summer or good weather to enjoy a fantastic beef roast.
When selecting your tri-tip, you'll typically find it in Select, Choice, or Prime grades. While Select is the lowest quality, we highly recommend opting for Choice or Prime grades for the best flavor and tenderness. These grades have better marbling, which contributes significantly to the succulence of your final dish.
The Secret to a Flavorful Roasted Tri-Tip: Seasoning and Method
Transforming a simple cut of beef into an extraordinary meal hinges on two main elements: the seasoning and the cooking method. For your easy oven-roasted tri-tip, we're going to embrace simplicity and effectiveness.
Crafting the Perfect Spice Rub
A simple yet potent spice rub is key to enhancing the tri-tip's natural beefy flavor. Our tried-and-true blend provides a savory, slightly smoky, and aromatic crust that perfectly complements the meat. You'll need:
- Kosher salt: Essential for seasoning and drawing out moisture for a better sear.
- Fresh cracked black pepper: Adds a pungent, zesty kick.
- Ancho chili powder: Offers a mild, smoky, and earthy depth.
- Smoked paprika: Reinforces the smoky notes and adds a beautiful color.
- Garlic powder: A foundational flavor that enhances almost any savory dish.
This combination creates a robust crust that adheres wonderfully to the meat, building layers of flavor with every bite.
Mastering the Reverse Sear Technique
The cooking method we employ for this Budget-Friendly & Tender: Mastering Oven Roasted Tri-Tip is the revered "reverse sear." Unlike traditional searing first, which can sometimes lead to a grey band of overcooked meat, the reverse sear ensures uniform doneness from edge to edge, with a perfect crust. Here’s why it works so well:
- Slow Roasting: The tri-tip bakes in a moderately heated oven (around 350°F / 175°C) until it's just shy of your target internal temperature. This gentle heat allows the meat fibers to relax and cook evenly, preventing toughness and locking in juices.
- High-Heat Searing: Once roasted, the tri-tip gets a quick blast in a scorching hot cast iron pan with a touch of oil. This final step is where the magic happens, creating a deep brown, crispy crust through the Maillard reaction, adding incredible flavor and texture.
Another crucial step is letting the tri-tip rest at room temperature before cooking. This allows the meat to relax and cook more evenly. A good 1-hour rest on the counter is ideal, or you can season and refrigerate it up to 24 hours, then let it come to room temperature for an hour before baking. This preparation ensures your tri-tip cooks through beautifully and retains its juices.
Step-by-Step Guide to Your Perfect Easy Oven Roasted Tri-Tip
Ready to create a culinary masterpiece? Follow these simple steps for a flawless oven-roasted tri-tip.
Preparing Your Tri-Tip and Spice Rub
- Mix the Rub: In a small bowl, combine 2 tsp kosher salt, 1 ½ tsp fresh cracked black pepper, 1 tsp ancho chili powder, 1 tsp smoked paprika, and 1 tsp garlic powder. Whisk them together until well blended.
- Season the Roast: Generously rub the spice mixture over every surface of your 2 to 2 ½ lb tri-tip roast. Don't be shy; ensure it's fully coated.
- Rest at Room Temperature: Place the seasoned tri-tip on a plate or cutting board. Let it rest at room temperature for at least 1 hour. If you've refrigerated it, allow a full hour for it to come to room temperature. This promotes even cooking. During the last 15 minutes of resting, preheat your oven to 350°F (175°C).
Oven Roasting for Tenderness
- Prepare Baking Pan: Place an oven-safe wire cooling rack over a rimmed baking sheet. This setup allows for even air circulation around the roast and prevents the bottom from getting soggy.
- Insert Thermometer: Carefully insert an oven-safe food probe thermometer into the center of the thickest part of the tri-tip. Set your thermometer's alert to 120°F (49°C) if you're aiming for a medium-rare final product.
- Bake Until Nearly Done: Transfer the prepared baking sheet with the tri-tip to the preheated oven. Bake for approximately 40 to 55 minutes, or until the internal temperature reaches about 5 degrees shy of your target doneness (e.g., 120°F for a 125°F medium-rare). Baking time will vary based on the thickness of your roast and desired doneness.
The Searing Finish: Achieving That Perfect Crust
- Preheat Skillet: While the tri-tip is nearing its target temperature in the oven, place a cast iron skillet (or another heavy-bottomed, oven-safe pan) on your stovetop over medium-high heat. Allow it to preheat for several minutes until it's scorching hot.
- Add Oil: Add 1 tablespoon of vegetable oil (or another high smoke point oil like canola or grapeseed) to the hot skillet. Swirl to coat the bottom.
- Sear the Tri-Tip: Carefully transfer the tri-tip from the oven to the hot skillet. Sear all sides for about 2-3 minutes per side, until a beautiful, deep brown crust forms. This process is quick, so keep a close eye on it!
- Check Final Temperature: Use an instant-read thermometer to check the internal temperature again. For medium-rare, aim for 125-130°F (52-54°C). For medium, target 130-135°F (54-57°C). Remember, the temperature will rise slightly during resting.
The Crucial Resting Period
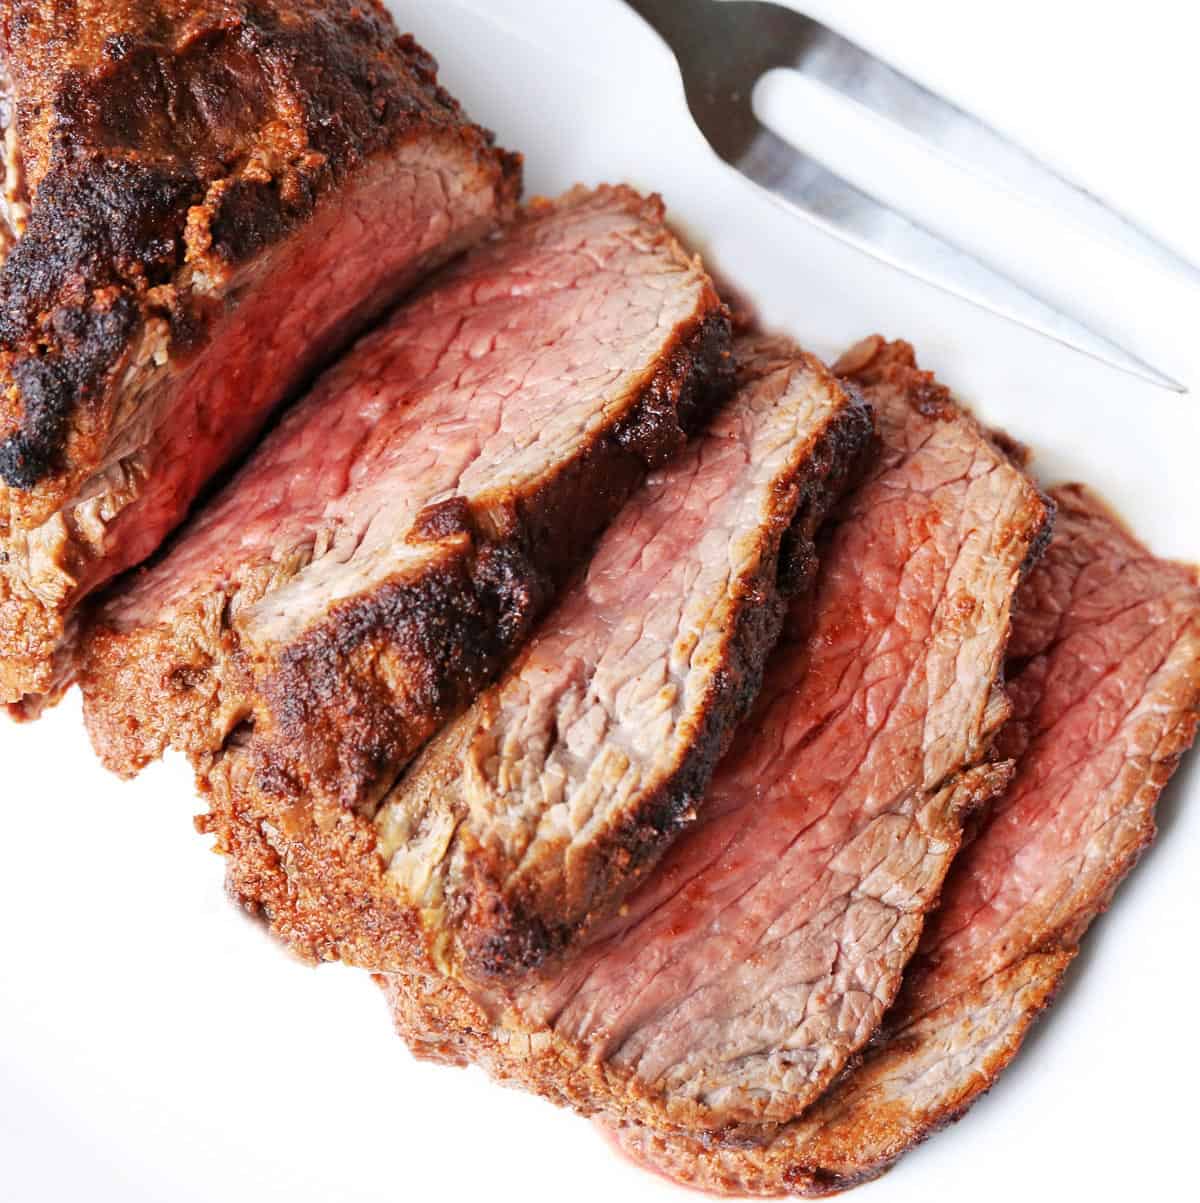
Once seared, immediately transfer the tri-tip to a clean cutting board. Tent it loosely with foil and let it rest for 10-15 minutes. This resting period is critical! It allows the juices, which have been pushed to the center during cooking, to redistribute throughout the meat, ensuring every slice is incredibly moist and tender. Skipping this step will result in juices running out onto your board, leaving you with a drier steak.
After resting, slice the tri-tip against the grain. Tri-tip has a unique grain that can change direction, so pay attention to how the fibers run and adjust your slicing angle accordingly. Slicing against the grain shortens the muscle fibers, making the meat much more tender and enjoyable to chew.
Tips for Success and Variations
Selecting Your Tri-Tip
- Grades Matter: As mentioned, aim for Choice or Prime grade tri-tip. The marbling (intramuscular fat) in these grades contributes significantly to flavor and tenderness.
- Fat Cap: Tri-tip often comes with a fat cap on one side. You can trim some of it down to about 1/4 inch, but don't remove it entirely before cooking. The fat renders during roasting, adding flavor and keeping the meat moist.
Doneness Levels for Roasted Tri-Tip
Use these internal temperatures as a guide, always checking with an accurate meat thermometer:
- Rare: 120-125°F (49-52°C)
- Medium-Rare: 125-130°F (52-54°C) - Recommended for optimal tenderness and flavor.
- Medium: 130-135°F (54-57°C)
- Medium-Well: 135-140°F (57-60°C)
- Well-Done: 140°F+ (60°C+) - Not recommended for tri-tip, as it can become tough.
Customizing Your Rub and Serving Suggestions
- Spice Variations: Feel free to experiment with your dry rub. Add a pinch of cayenne for heat, dried rosemary or thyme for herbal notes, or onion powder for extra savory depth. A touch of brown sugar can also help with crust formation.
- Serving Ideas: Oven-roasted tri-tip is incredibly versatile. Serve it as a main course with roasted potatoes, a fresh green salad, or creamed spinach. It also makes fantastic steak sandwiches, tacos, or a hearty addition to a beef salad. Consider pairing it with a simple chimichurri or a red wine reduction for an extra touch of elegance.
- Storing Leftovers: Any leftover tri-tip can be stored in an airtight container in the refrigerator for 3-4 days. It's delicious cold for sandwiches or gently reheated for another meal. Slice it thinly for best results.
Mastering the art of easy oven-roasted tri-tip opens up a world of culinary possibilities. This method, combining a simple spice rub with the effective reverse sear technique, guarantees a tender, juicy, and incredibly flavorful steak every single time. No grill? No problem! You now have the skills to create a perfect, memorable beef roast that can be enjoyed year-round, regardless of the weather. So grab a tri-tip, get roasting, and prepare to savor one of the most delicious and easy steaks you've ever made.
